Bari is the owner and designer behind Bari J. For more information, visit barij.typepad.com and barijonline.com.
What you’ll need:
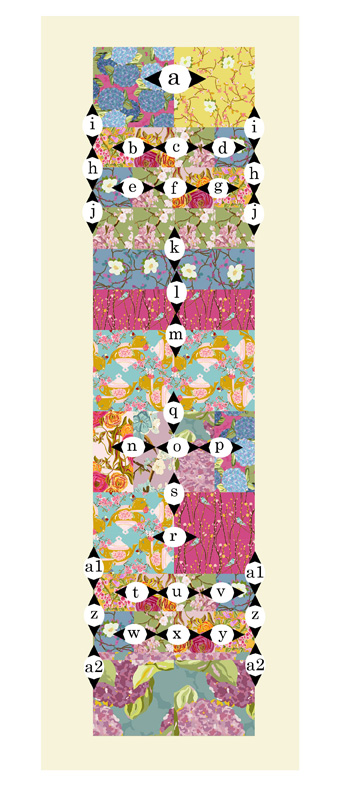
- A variety of colorful fabrics in measurements indicated on the diagram. (The sample runner uses my first line of fabrics, Full Bloom, for Windham Fabrics.
- Various cutouts from floral fabric to form motifs for the border
- Sewing machine with free-motion quilting feature
- Coordinating thread
- 2 yards of muslin or cotton print of your choice for backing
- 2 yards of flannel or light batting
- Quilting gloves (optional)

Cutting instructions: Cut all pieces as indicated on the diagram. Note: All measurements are width by height.
Piecing instructions: Follow the diagram in alphabetical order to sew the pieces together. Each of the letters on the diagram represents a seam. You’ll see the letter “A” on the diagram with arrows pointing in each direction to two squares of fabric. Sew those two pieces together using a ¼-inch seam allowance. Next, sew together the two pieces marked “B.” Continue sewing together the squares until you finish “A2.”
Collage border:
1. It’s important to have your finished piecing centered on the quilt backing before starting the borders.
2. Cut flannel and backing so it is at least six inches wider than the quilt all the way around.
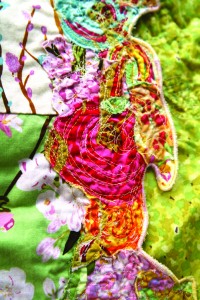
3. Cut out the motifs to go all around your quilt, layering one upon the other. You can even have pieces that are partial if you layer another on top of it.
4. Lay out your composition on the edges of the quilt. You can overlap or go slightly over the edge, making sure you cover all of the flannel backing between the collage and your piecing.
5. Pin all of the motifs with many pins to the backing. Shake quilt to make sure all your pieces are pinned well.
6. Use the free-motion technique with your sewing machine to quilt each motif onto the piecing. This is done by sewing with your machine’s feed dog down and by using a free-motion quilting foot. Note that you’ll be just doodling here—loose and free. Don’t worry too much about whether or not your stitches are completely even. After you wash the quilt, none of that will be noticeable.
7. Cut excess flannel and backing out all around the motifs, right up to their edges.
8. To finish the edges, zigzag stitch at least three times around the entire piece, making your stitches shorter each time around. This will give you a nice satin stitch.
9. Trim your threads and wash the quilt to give the border a nice wrinkly texture.
